
Have you wanted to convert your Pontiac,GTO, or Firebird from the troublesome external regulated alternator to an internal regulated alternator?
PLEASE NOTE: Always disconnect the battery when doing electrical work on your car!
Here is a how-to for the conversion from an external regulator alternator to a "SI" internal regulator alternator.
The bracket configuration is the same for the external and internal alternators.
The colors of the wires called out are the "standard" colors and I can't swear that your car's wiring loom matches.
When you convert from the external regulator alternator, you no longer need the regulator that is mounted on the radiator support or firewall.
Or,you could gut the inside of the regulator and solder a jumper from the F terminal to the 4 terminal inside the case.
Then do the same for the 2 and 3 terminals.
This would appear factory still with a cursory glance.
The diagram below shows the original connection at the old regulator.
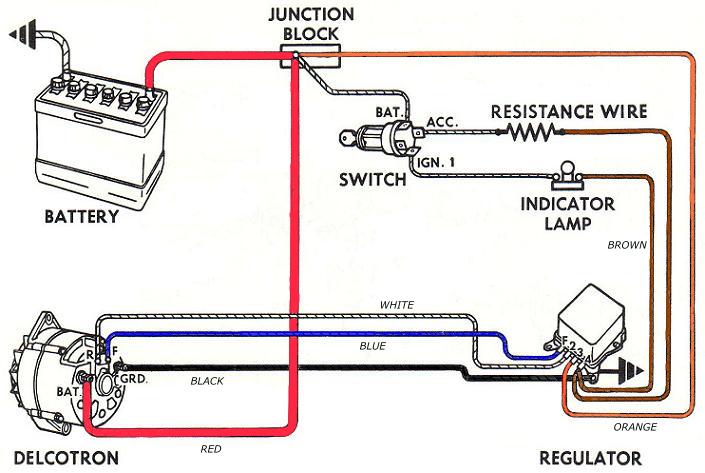
The next diagram shows how you modify the loom at this location.
Unplug the connector from the regulator. Either make a jumper with spade terminals that plug into the harness terminals, or cut the wires and connect them together in the following way:

Notice that the blue wire is jumpered to the brown wire (as in the above diagram).
The white wire (yellow in pic) and the orange wire are jumpered together.
The wire colors may be different for different years or models.

You will need a new connector to fit the new alternator and they can be purchased at almost any auto parts shop.
The original alternator connector wire that went to the 'F' terminal on the alternator will go to the '2' terminal on the new plug.
The original alternator connector wire that went to the 'R' terminal on the alternator will go to the '1' terminal on the new plug.
In order to ensure good connections, I recommend that you always solder the connections and then use heat shrink tubing to seal it.